

How To Turn Off Auto Mantle Warzone
You have an exceptional breadth of options to control your character within Warzone with countless tweaks, configuration changes, sensitivity toggling, and masses of other minor elements to finely tune. Hither, nosotros'll offering a quick overview of the different settings you can fiddle with, almost of which can be inverse before and during gameplay. Plus, we'll go over all the bones controls and features of your heads-upwards display (HUD).
Note: This guide covers the PC version of the game.
For the PS4® and PS5® version of this guide, go here.
For the Xbox I and Xbox Series X | South version of this guide, go here.
Warzone PC Specifications
PC gaming is all most customization and withWarzone, the squad is delivering a robust set of customization options. The goal is to allow each player to tailor their gameplay feel to their private playstyle. This ranges from a diversity of graphics settings so you lot can find your perfect remainder between graphical allegiance and framerates, besides equally expansive customization so y'all tin can control the game exactly how you lot want to.
Note! In each of the Specs, the HDD references HD space of 175GB. 175GB is the storage space we recommend players keep available in gild to download the full game, and the mail service-launch content forModern Warfare. The initial download for the Warzone manner volition exist smaller.
With this in mind, here are the hardware specs required to playWarzone.
Minimum Specs:
Here are the Minimum specs needed to playWarzone:
· Requires DirectX 12 compatible arrangement
·OS: Windows 7 64-Bit (SP1) or Windows x 64-Bit
·CPU: Intel Core i3-4340 or AMD FX-6300
·Video: NVIDIA GeForce GTX 670 / GeForce GTX 1650 or Radeon Hard disk drive 7950
·RAM: 8GB RAM
·HDD: 175GB Hard disk space
·Network: Broadband Internet connection
·Sound Card: DirectX Uniform
Recommended Specs:
Hither are Recommended Specs to run at 60fps in most situations with all options set up to medium:
· Requires DirectX 12 compatible arrangement
·Os: Windows 10 64 Flake (latest update)
·CPU: Intel Core i5-2500K or AMD Ryzen R5 1600X processor
·Video: NVIDIA GeForce GTX 970 / GTX 1660 or Radeon R9 390 / AMD RX 580
·RAM: 12GB RAM
·HDD: 175GB Hd space
·Network: Broadband Net connectedness
·Sound Carte: DirectX Compatible
Recommended Specs (boosted):
Here are the Recommended specs for employ with Ray Tracing:
· Requires DirectX 12 uniform system
·Os: Windows ten 64 Bit (latest update)
·CPU: Intel Core i5-2500K or AMD Ryzen R5 1600X processor
·Video: NVIDIA GeForce RTX 2060
·RAM: 16GB RAM
·HDD: 175GB Hard disk drive space
·Network: Broadband Internet connection
·Sound Bill of fare: DirectX Uniform
Competitive Specs:
Here are the Competitive specs to run at a loftier fps for use with a high refresh monitor:
· Requires DirectX 12 compatible system
·OS: Windows 10 64 Scrap (latest update)
·CPU: Intel i7-8700K or AMD Ryzen 1800X
·Video: NVIDIA GeForce GTX 1080 / RTX 2070 SUPER or Radeon RX Vega⁶⁴ Graphics
·RAM: 16GB RAM
·HDD: 175GB Hard disk drive infinite
·Network: Broadband Internet connection
·Audio Carte du jour: DirectX Compatible
Ultra RTX Specs:
Finally, here are the Ultra RTX specs to run the game at a high FPS in 4K resolution with Ray Tracing:
· Requires DirectX 12 compatible organisation
·Os: Windows 10 64 Scrap (latest update)
·CPU: Intel i7-9700K or AMD Ryzen 2700X
·Video: NVIDIA GeForce RTX 2080 SUPER
·RAM: 16GB RAM
·HDD: 175GB Hard disk space
·Network: Broadband Net connection
·Sound Card: DirectX Compatible
Heads Upward Display: Information from the Field of Battle
The images beneath show examples of the in-game HUD you lot would see in Warzone. The different elements of the HUD provide quick, important, and tactical data that you must learn and utilize every bit you grow every bit a histrion. Here'southward a brief look at what appears on-screen:
Heads Upward Brandish: Information from the Field of Battle
The images below evidence examples of the in-game HUD you would see in Warzone. The different elements of the HUD provide quick, important, and tactical data that you must learn and utilize every bit you abound as a player. Hither'due south a brief look at what appears on-screen:
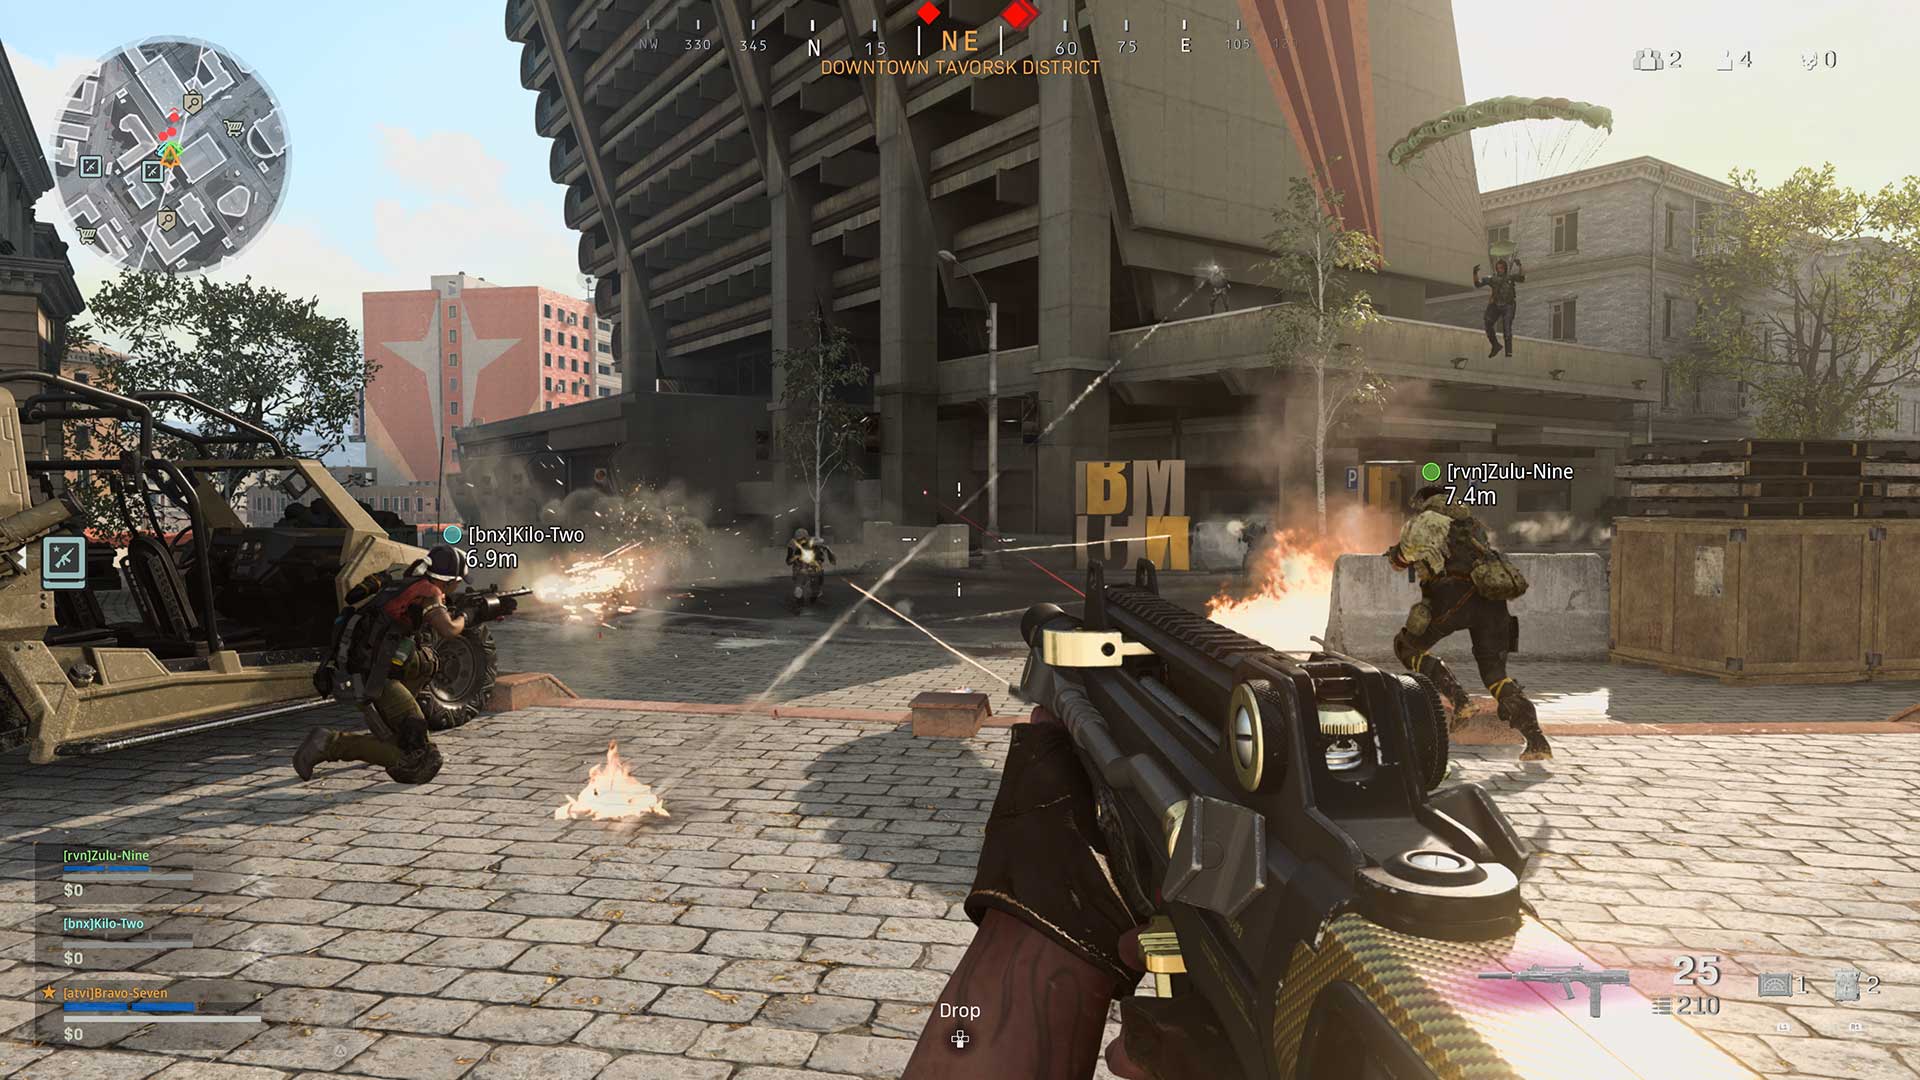
HUD Intel: In-Game
Mini-Map (Top Left): Need to know where yous are? Expect upwards here to see where you, and your squadmates, are located within a portion of Verdansk that represents your immediate vicinity. A more detailed Tac Map tin be seen past pressing the Touchbar (see boosted information on the Tac Map below).
Timer (Top Left): Next to the mini map, a timer shows the number of minutes and seconds until the next circle plummet, or until the current collapse is over.
Contracts Timer (Top Left): When a Contract is agile, you may see a timer showing how much time remains to complete the associated objective.
Active Contracts and Objectives (Top Left): Whatever agile Contract and its level, along with objective information and Payout data, is situated underneath the mini-map.
Compass (Superlative Middle): This offers complete 360-degree information. The precise degree you're facing is shown in a yellowish/dark-brown color in the middle of the Compass. Numbers alter to Compass directions within five degrees of 0 (North), 45 (Northeast), xc (Eastward), 135 (Southeast), 180 (South), 225 (Southwest), 270 (W), and 315 (Northwest).
Compass (Other Markers): Other markers may appear here including, only not limited to:
Cerise Diamond Markers: These markers prove where enemies are firing from. They appear as sold red diamonds if the enemy fire is coming from in front of you lot (inside the bar of the Compass), or red arrows to the left or the correct if the enemy is to either side of you.
Chevron Arrow Markers that y'all or your squadmates have placed on the map (using the same colour equally your squadmate).
Loadout Drop Icons showing where a Loadout Driblet has been delivered (Boxing Royale mode only).
Pinged Icons revealing Vehicles or Items that y'all or your team has marked.
Contract markers that bear witness the general direction of objectives.
These markers disappear from the Compass and rotate around the perimeter of the screen when y'all aren't directly facing them.
Anteroom Info (Top Right): See the number of players – or squad, if applicative – left alive in the game, besides equally the number of spectators – if any – that are watching you play from the nifty beyond. The final icon, a skull, indicates how many kills you take in the game.
Crosshairs (Center): Displays the location your weapon will fire at. Depending on the weapon you're employing, whether you are hip-firing or aiming down sights, or beingness stationary versus moving about, your crosshairs volition be large, small, or be replaced past the weapon's fe sights or attached optic sight picture.
Item Choice Upwardly and Information (Heart): When you lot see a Supply Box, Buy Station, or an object that's available to selection up, a context button and data box is displayed.
Expect the following Items to be found, many colour-coded with their Rarity:
Ammo, Armor, Contracts, Loadout Drops, Field Upgrades, Gas Masks, Tactical and Lethal Equipment, Cash, and Weapons.
This expanded information box displays information such as:
Name and Type: The official name and type of object you're well-nigh to get together.
Rarity, Color-Coding: The rarity, which refers to how often y'all'll discover the item in the Warzone, and sometimes (but not always) too refers to the potency of the detail in question, is also shown, both as a diamond icon too equally a related colour, as follows:
Low-cal Ruddy (Player): Either your starting pistol or weapons that come out of a Loadout Drop (Battle Royale) or a Loadout you bring with you (Plunder). A "diamond inside a diamond" icon.
White (Common): A ubiquitous detail, institute in most locations, such equally Ammo. An "empty diamond" icon.
Green (Uncommon): Institute relatively easily across the combat zone. A "diamond within a diamond" icon.
Light Blue (Rare): Found sporadically across the combat zone. A "diamond with 2 diamonds within" icon.
Majestic (Epic): Expect simply a few of these to exist found during a game, with a stiff item to use. A "diamond with three diamonds within" icon.
Gilt (Legendary): Await 1 or 2 of these most powerful items to be acquired during a game. A "diamond filled with four other diamonds" icon.
Dark Red (Ultra): Usually not found within a game at all, this rarity is exclusive to Mastercraft and Reactive Weapon Blueprints out of the game inside the Battle Laissez passer or Store Bundles. A "diamond with 4 chevrons around a diamond at center" icon.
Attachments (Weapon): Bated from Loadout Weapons you've personally equipped and can obtain via Loadout Drops (Boxing Royale fashion) or at the start of a friction match (Plunder style), all other weapons gathered beyond the Warzone that can have attachments fitted to them, have a stock-still number based on their rarity, every bit follows:
Common (0). Uncommon (1). Rare (3). Ballsy (4). Legendary (all 5).
Take/Bandy (Ammo, Items, Equipment, Weapons): Equally y'all have a finite amount of equipment you tin can acquit, if an detail can be added to your inventory, theS word "Take" appears in the box. If an item in your inventory must be dropped in order to apply the detail, the word "Bandy" appears in the box.
Amount (Ammo): If there's multiples of an particular (almost always ammunition), the amount of that particular is displayed.
Read more about all the bachelor items in the Inventory part of this guide.
Weapons Detail (Bottom Right): This gives immediate knowledge of the weapon yous're currently holding, the chamber and total ammunition, the weapon's rarity, and the type of firing choice yous've selected for your weapon (if applicative). In add-on, your tactical and lethal equipment, along with the amount carried, are too prominently displayed.
Killstreaks/Field Upgrade (Bottom Right): If you come across a Field Upgrade – a special equipment piece or ability – or a Killstreak – a powerful offensive, defensive, or reconnaissance item – during your travels, it volition appear above your Weapons Detail. Killstreaks will appear on your HUD in small boxes, while Field Upgrades will show upwards inside of a circle.
Operator Opinion: A small-scale silhouette of your operator is shown in one of three different stances; Continuing, Crouching, or Decumbent (Crawling), presently after going into i of these stances.. You can quickly glance to see your stance, and the advantages (and disadvantages) your stance grants you depending on the situation.
Drop (Lesser Middle): Admission the quick driblet using the d-pad, then the Triangle button, and you're able to drop certain items on the basis, usually for squadmates to pick up. The subsequent Drop carte du jour shows (from left to right); Cash, Self-Revive Kits, Armor Plates, and the v different ammunition types. Likewise use this card to apace check how many aforementioned items you have.
Armor Plates and Gas Mask (Bottom Left): When yous've caused, merely non used an Armor Plate, it is displayed here (you can carry up to v). Equip an Armor Plate using the Triangle button to increase the armor bar (in a higher place your wellness bar). When you've acquired the Gas Mask, it is displayed here. The amount of health the mask has will appear next to your health.
Health (Bottom Left): A single white bar represents your total health. When it drops to nil, y'all enter a downed state where you tin slowly move without the power to defend yourself, until a squadmate can revive y'all or you bleed out.
Cash (Plunder Way but): The total Cash you've nerveless is also displayed here. Beneath this is a sliding bar showing your team'south total Cash gathered (both banked and carried) along with your ranking within the friction match, and how much Cash the number 1 squad has gathered.
Armor (Bottom Left): In a higher place the Health bar are iii blue rectangles; this represents the number of armor plates y'all currently have on your operator. You find and use Armor Plates to fill up this bar up to three times, giving y'all Level i, two, and 3 armor corresponding to the number of equipped Armor Plates. Note additional Armor Plates you're carrying are indicated just to the right of this bar.
Team Details: Your squadmates' names, health, armor, and Greenbacks will appear above your personal stats as smaller bars. In addition, an icon displayed shut to your squadmate's wellness bar indicates the following:
Contract Icon: They are completing a contract.
Parachute Icon: They are parachuting into the combat zone.
Redeploy Icon: They take a Cocky-Revive Kit (displayed by a cantankerous in a circle below your squadmate's health bar).
White Cantankerous with 1 of 3 arrow types: Your squadmate is downed. The color of the associated arrow and status bar indicates your squadmate's specific land:
Down Arrows and Red Status Bar: Your squadmate is downed and bleeding out.
Up Arrows and Dark-green Status Bar: Your squadmate is being revived by another squadmate.
Upwards Arrows with Teal Statue Bar: Your squadmate is using a Self-Revive Kit.
Gulag Skull: They are fighting for their life in the Gulag.
Skull: They are neutralized simply may exist redeployed.
Steering Bicycle: They are driving or piloting a vehicle.
Gunfire Icon: This wink icon appears intermittently and indicates when a squadmate is firing their weapon. Use it in conjunction with other methods to ascertain the combat situation your squad is in.
Lastly there is other HUD data that isn't always displayed on your HUD:
Pinged Icons: The following pinged icons can announced on your HUD:
Chevron Arrow Icon: A generic marking set up past one of your teammates.
Red Diamond Icon: A marker that is meant to caution you and your teammates about enemies at or nearly that area.
Yellow Assertion Point Icon: A marker assault an open door or Supply Box that indicates that an enemy already opened it.
Green Skull Icon: Appears on or in the management of the nearest Buy Station is then that you can redeploy a teammate.
Vehicle Icon: Appears on or in the management of the vehicle that was pinged. The icon represents the specific vehicle that was pinged.
Item or Weapon Icon: Appears on or in the direction of an item or weapon that was pinged. A generic prototype of the item, as well every bit its rarity color, is shown within this ping.
Loadout Drop Icon: Appears on or in the management of a Loadout Drib.
Buy Station Icon: Appears on or in the direction of a Buy Station that was pinged.
Green Cash Icon: A dark-green $ icon that appears on or in the direction of a piece of loose Cash that was pinged.
Greenbacks Drop Icon: A green $ icon in a box that appears on or in the direction of a Greenbacks Drop that was pinged.
Greenbacks Extraction Bespeak / Light-green Piggy Bank Icon: This dark-green piggy bank appears to show the location of a Cash Extraction Signal to deposit Cash in Plunder. When information technology is bright greenish, it means that a helicopter has been called in to extract greenbacks.
Additional HUD Intel:This is information that will only appear in certain situations and won't always exist on your HUD. For example, a reload prompt will come up when you're low on bullets in your sleeping accommodation. In addition, await other icons to appear, indicating in-game action commands such as mantling when there are objects you can mantle over, or areas you tin mountain your weapon to (while holding down the aim/ADS trigger). Status on capturing an objective also appears will appear on the HUD. The display location can vary, only typically this type of information will appear on the eye of your HUD.
Boosted HUD Intel: Pre-Match In-Game Antechamber
Altimeter (Right): When parachuting into a pre-match, in-game lobby, or descending during your initial Infil driblet, the right side of your screen shows your altitude, as well equally your speed, and last possible parachute-deployment height.
Antechamber Population (Upper Heart): Just nether the Compass is the updated number of players waiting in the antechamber, prior to Infil.
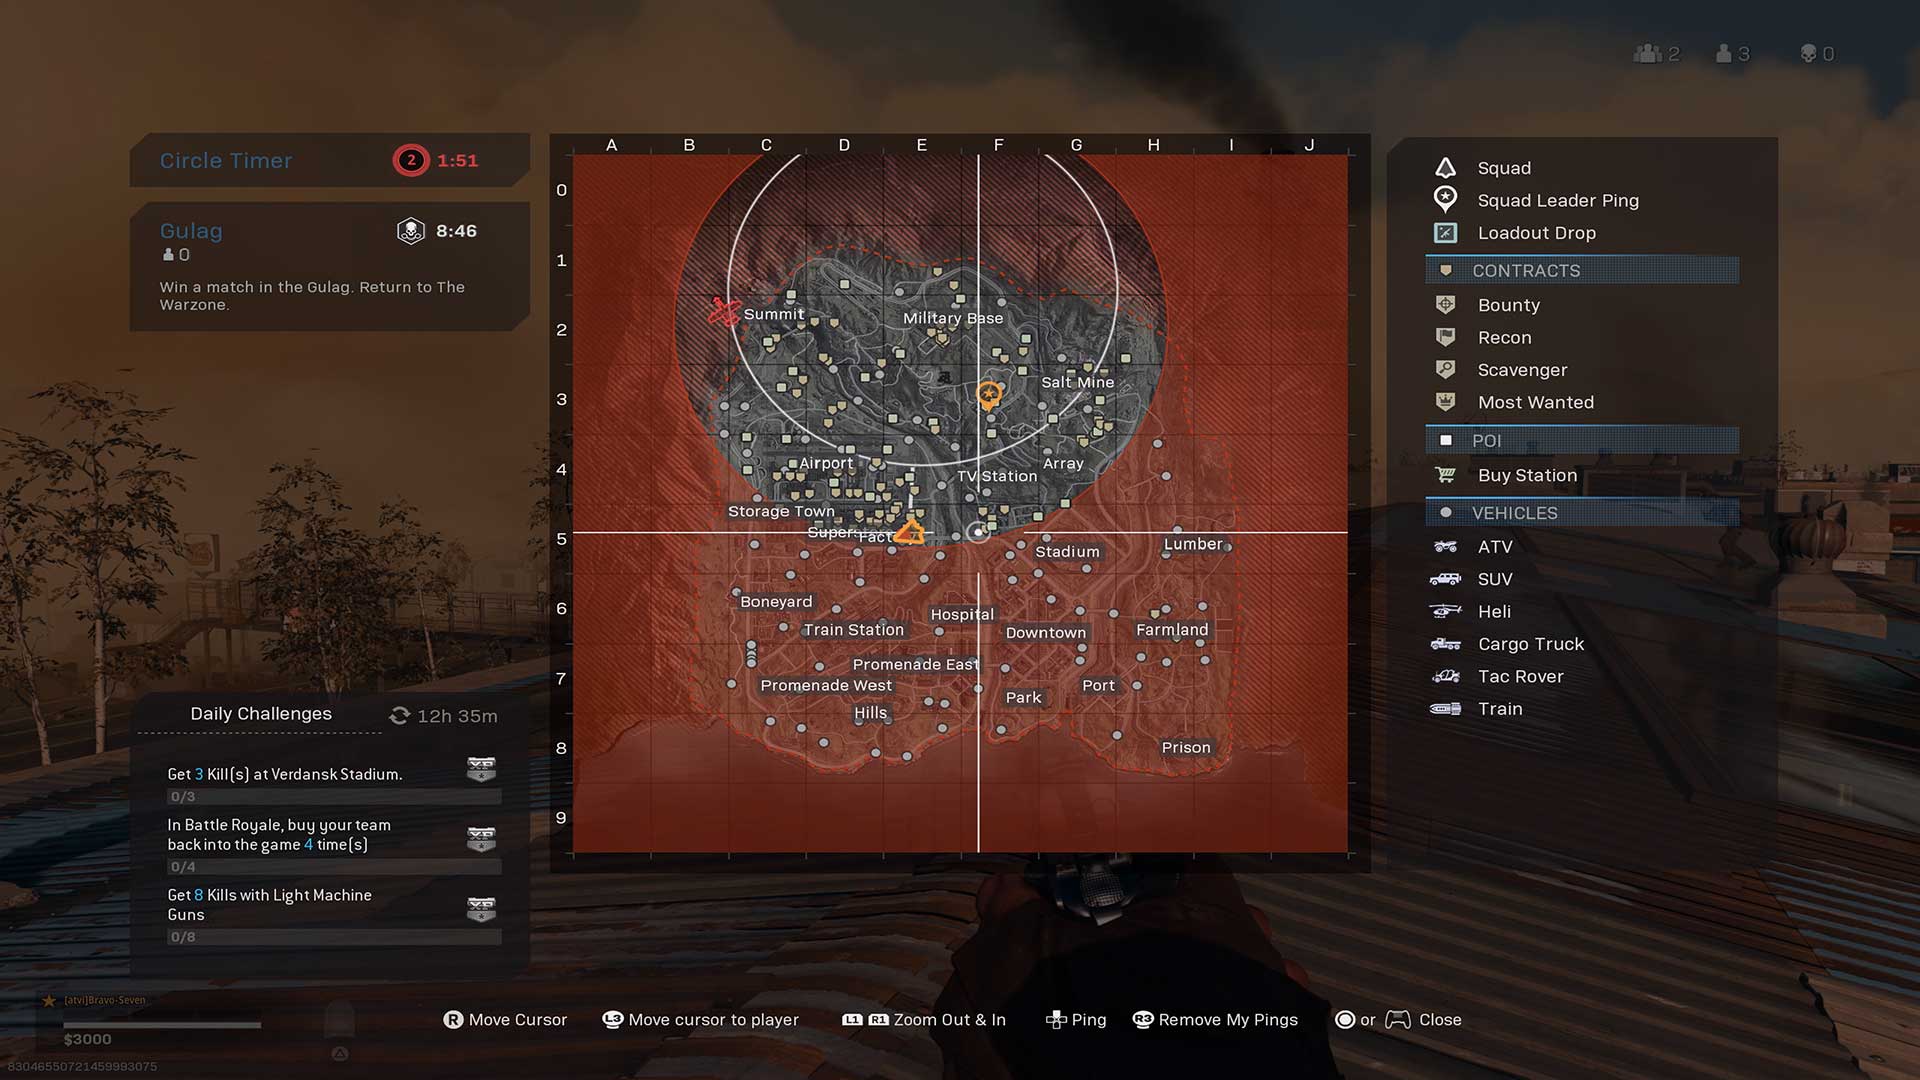
Boosted HUD Intel: Tac Map (In-game)
Bring up the map during a match, and yous're presented with a variety of icons and content, every bit follows:
Circle Timer (Boxing Royale mode just) (Peak-Left): A circle of lethal gas is slowly encroaching on the Warzone and keeping runway of it is of paramount importance. The circumvolve itself is visible on the map, but the timer shows how long the circle will remain in its current land before shrinking, forcing those outside the circumference to seek prophylactic in the breathable atmosphere inside the circle.
Redeployment (Boxing Royale mode just) (Top-Left): You tin can redeploy in multiple ways throughout a Warzone match. This indicates how much fourth dimension at that place is left earlier redeployment is no longer available to y'all or your squad.
Gulag (Battle Royale fashion but) (Top-Left): This reveals how many players are currently fighting in the Gulag for the risk to redeploy, equally well equally when the Gulag shuts down (after which, no further 1v1 Gunfight matches are immune). The Gulag closes at the finish of the fourth circle plummet, after which you lot cannot enter the 1v1 Gunfight portion of the prison house.
Self-Revive Kit and Squadmate Revive Kit (Top-Left): This shows how many Self-Revive kits you have. Larn these by purchasing them at Buy Stations and use them on yourself or drop them for your squadmates to pick upwardly. The last possible time to apply Self-Revive Kits is as well flagged here. Notation you can purchase revive kits for every bit long as you can reach a Purchase Station and take the Cash funds.
Tac Map (Main Key Image): This map of the entire warzone is updated in real-time and shows many (but non all) of the mural sectors, as well equally various important icons listed in the Legend. Check this for a variety of reasons; to see your squadmates' locations, the deployment path, Circumvolve Plummet (in Battle Royale mode), and other pertinent data.
Notation the coordinates (X axis and Y axis) which tin be optionally utilized by your squad to call out locations (for example, "I'm landing at H1" instead of "I'k landing at Quarry.").
Legend (Correct): Icons of y'all and your team are revealed, along with Loadout Drops you lot may have chosen downwardly. Contracts, Buy Stations, and Vehicles are also flagged here.
Map Manipulation Functions (Bottom): You tin can zoom in and out, move the map around to study it and the icons placed on it, zero in on your current position, and place or remove Ping markers that is displayed on yous and your squad'southward Compass. Use Pings on general areas to highlight specific objects (such as Buy Stations, Vehicles, or Contracts).

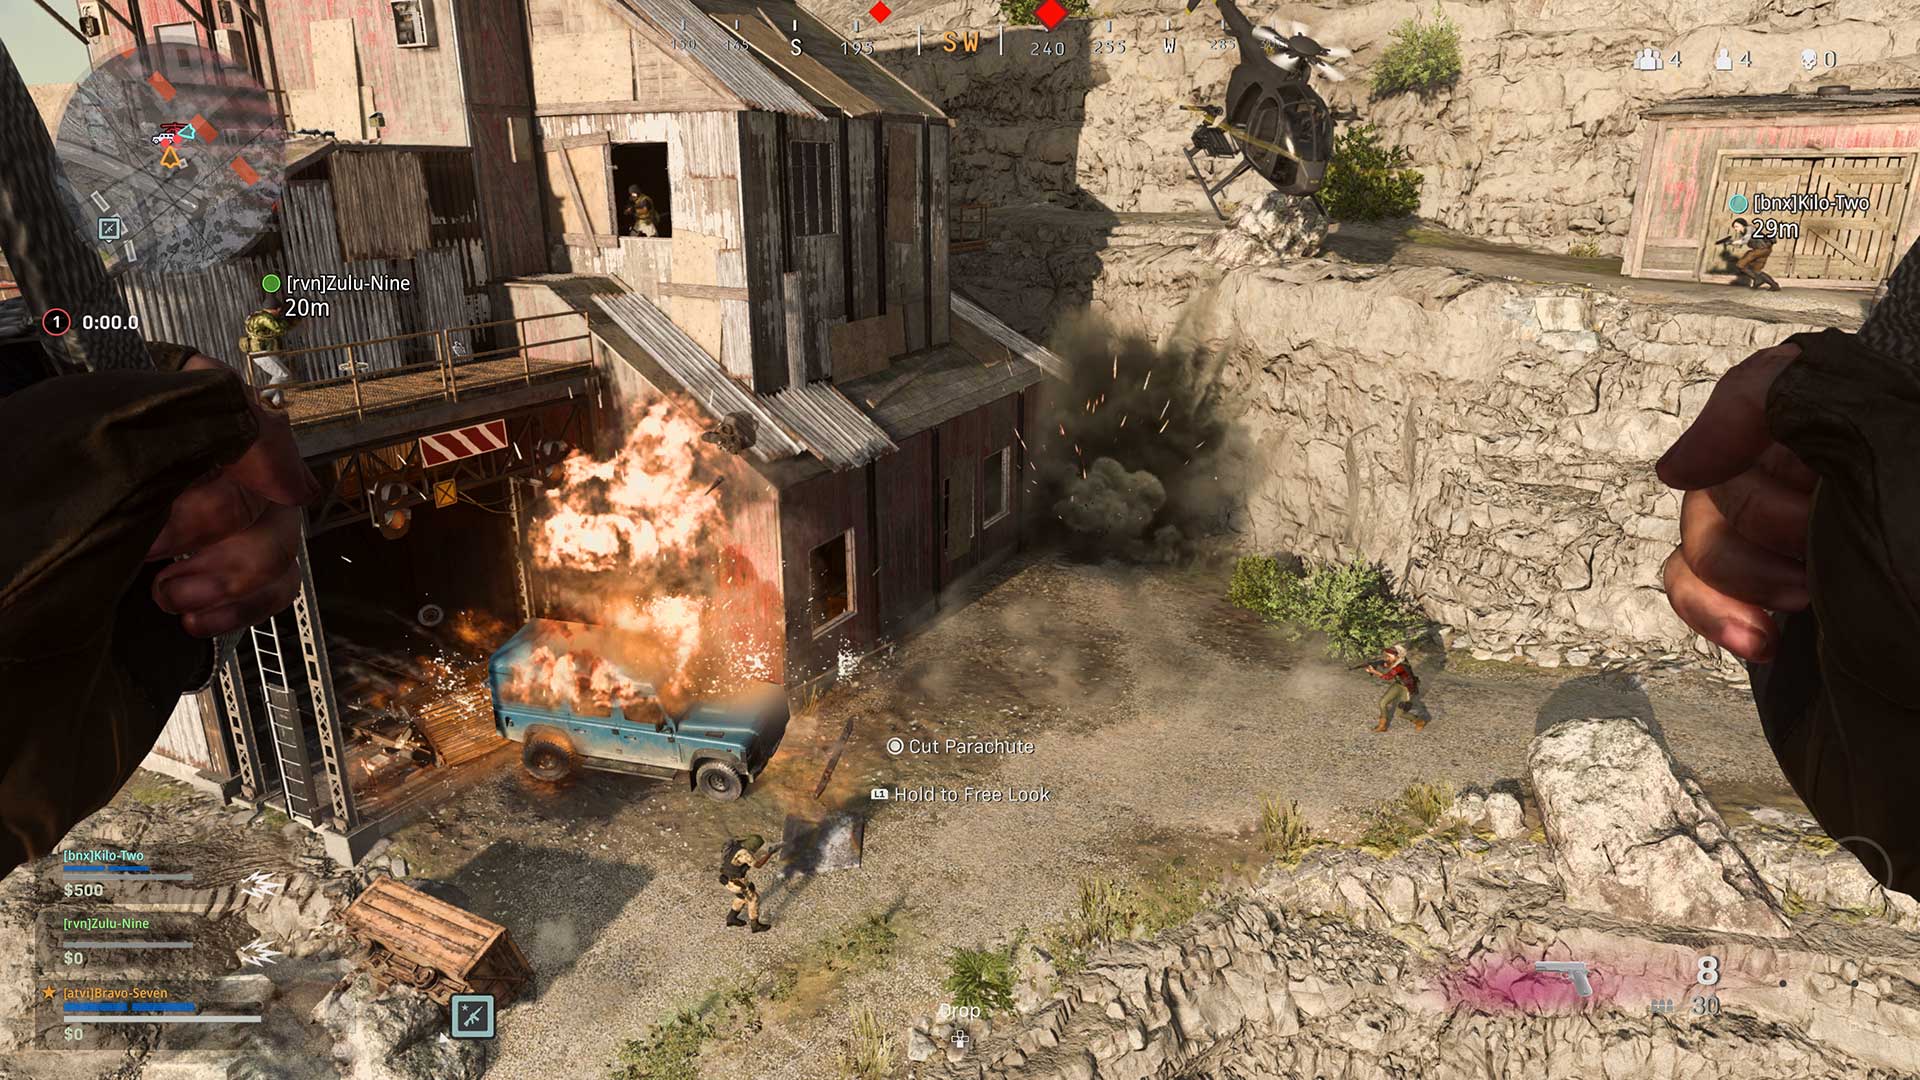
Additional HUD Intel: Vehicle (In-game)
Should yous pilot, drive, or take a seat inside one of the vehicles, there are a couple of additional HUD assets to be enlightened of:
Vehicle Health (Bottom Eye): The health of the vehicle you are currently utilizing is displayed in a white horizontal bar. Consider extracting yourself from the vehicle when this bar is diminished. The vehicle explodes when the bar is empty.
Vehicle Seats and Controls (Lesser Middle): The important controls of the vehicle, along with where you (and your squadmates) are sitting, is besides displayed.
Gaining Complete Control
When using a keyboard and mouse inWarzone on default settings, its buttons have the following commands (these settings tin be adjusted in the Controller Settings Options carte du jour):
W, A, S, D – Movement:Employ these keys to motion forrad (W), left (A), backwards (S), and right (D).
Mouse – Aim/Await:Push button this stick in any management to take your Operator look effectually or aim a weapon.
Left Click – Aim Down Sight: This narrows the field of view to focus on a specific target for more precise gunfights. Additionally, ADS zooms into your equipped sights (reticle or native). Pressing Left Click also allows you to mount your weapon if you're shut to a wall, windowsill, or other scenery that allows it. Specific settings for Weapon Mount Activation can be configured in the Options Menu, but the default is ADS + Melee.
Right Click – Fire Weapon: This expels projectiles from your weapon's sleeping accommodation. Pay attention to your weapon'southward firing way – single, burst, or fully-automatic – every bit you may demand to press this trigger multiple times for continuous firing.
F – Use: If you need to admission a context-sensitive object (like opening a door instead of charging through it), press this cardinal.
R – Reload:Depression on ammo? Printing this button to reload a weapon.
Space – Spring/Stand/Drape/Cut Parachute:Jump across gaps, drape over lower objects such as barriers or windowsills, and climb sure scenery using this push. The top of your leap may exist influenced by your speed and the number of successive jumps you've taken. During infiltration, this is the push you press to open your parachute, which is crucial to your survival.
C – Hunker/Slide When moving under normal circumstances, you tap this button to hunker. If y'all're sprinting and hold this button, you'll slide into a crouch or a prone position if yous continue holding the push button (on the default sliding controls).
Left Ctrl – Prone:Tap this key to become decumbent, lowering your center of gravity in order to do actions such equally crawling under objects.
Left Shift – Sprint/Tactical Sprint/Steady Aim Freelook: If you're maneuvering, tap while you motion to dart, or tap twice quickly while moving to tactical sprint (which causes you to motility more quickly than a sprint, only with your weapon pointed up and held in i hand, lengthening the time it takes to aim and appoint the gun). If you're using a sniper rifle, tap this to take an inhale of breath, and steady your aim past a significant amount. While infiltrating or parachuting, tap this to switch from a start to a third-person perspective while parachuting; this allows y'all to increase your peripheral vision which tin aid you achieve a landing spot, or see enemies landing close to, or backside y'all.
1 or Mouse Wheel Up – Next Weapon: Swap to your next weapon past either pressing the i key or rolling the mouse wheel up.
2 or Mouse Wheel Down – Previous Weapon:Swap back to a previous weapon by either pressing the 2 key or rolling the mouse wheel downwardly. Depending on settings, using the Adjacent or Previous Weapon commands will "wrap" weapon selection around or finish at the first and last weapons in a loadout.
Mouse Button 4 or Z – Mount:Press this to mountain a weapon if yous're close to a wall, windowsill, or other scenery that allows this.
B – Fire Manner:Utilizing this function when using a weapon that offers multiple firing modes – i.e. an set on rifle that has both fully-automatic and outburst burn modes – changes the fire fashion of that weapon.
Mouse Button 5 or E – Melee:Pistol whip, strike, or otherwise bludgeon a foe at close quarters with the melee attack or hold to attempt a Finishing Move when attacking an unsuspecting foe from behind. You can also melee doors open, too.
Q – Tactical Equipment: This utilizes the tactical equipment that you've found; usually a non-lethal Grenade, but a Stim or Heartbeat Sensor are likewise options.
G/Mouse Wheel Press – Lethal Equipment: This utilizes the lethal equipment that you lot've plant; which ranges from Proximity Mines to C4, to a Throwing Knife, to a proficient erstwhile-fashioned Frag Grenade.
10 – Apply Field Upgrade:Whenever you find an in-game Field Upgrade, i.e. a Trophy System, printing this key to actuate information technology.
3/K – Killstreak:This engages a Killstreak that yous found in game. Tap right to launch a Killstreak or concord correct to open up a radial menu and select a Killstreak if you lot have more than than ane bachelor.
4 – Equip Armor: Pressing this push makes your Operator equip an Armor Plate, if you accept one.
T – Ping/Gesture/Spray:Pressing this button will ping a 3D position in the environs and put a mark on the map for yous and your squad. Belongings it enables a chosen mitt gesture or spray in Warzone. Use them to:
Gesture: Straight squadmates without a microphone.
Spray: Brighten up your immediate surroundings.
D-pad Left – Fire Style: Utilize this function when using a weapon that offers multiple firing modes to change the burn manner – i.e. an assault rifle that has both fully-automatic and flare-up fire modes.
~ – Drop:Do yous have extra ammo or Cash to share with a squadmate? Printing this to open up the Driblet carte and share those supplies.
Tab– Tac Map: Tap this to come across the entire in-game map. Forth with a coordinates chart and a topographical version of Verdansk, you can also see where your squadmates are, where the collapse is closing in on, and icons that represent Contracts, Vehicles, and more. These icons can be toggled on or off with a simple on-screen push button prompt.
F3/F2– Suspension/Dismiss Interruption Menu: This brings upward or dismisses your Pause bill of fare. In the Warzone carte, you tin run into your team's score, including damage dealt, revives, kills, and Cash. In add-on, y'all can access social options and enter the robust Options card to change every aspect of control scheme.
Speaking of Options…
An Overview of Options
Warzone has a slew of customization settings to make the game experience comfortable in your easily. Whether information technology's keybinding options, field of view sliders, or avant-garde graphics settings, you'll take plenty of options to create the best PC experience for you.
Below are simply some of the exclusive settings available to keyboard and mouse users across all platforms, followed past PC-specific options:
Keyboard & Mouse Options:
Keybinds
At the bottom or inside every card of this department, there is the option to arrange Keybinds. Every single basic control tin can be inverse to a different primal from the default. Essentially, if a command is mapped to a push on the mouse or keyboard, it can be re-mapped in Warzone.
Mouse
Under this submenu are a few different options that pertain to just Mouse controls:
Beginning is Mouse Sensitivity. You tin can take different sensitivity settings for dissimilar situations such as Ground Vehicles, Air Vehicles, and Tablet Sensitivity within the Avant-garde carte.
Sensitivity settings can be farther refined with two options for how ADS Mouse Sensitivity is handled: Legacy, which makes rotation speed feel faster when aiming down sights, or Relative, which uses an improved mouse algorithm to friction match mouse movement with on-screen motility without being affected by field of view. This is very useful for training musculus retentiveness to acquire the verbal mouse movement needed to hit a certain location on screen. You can even set dissimilar sensitivity multipliers for rifleman and marksman scopes, as well as ADS Sensitivity Transition Timing, which allows you to change when sensitivity multipliers are practical while transitioning to an ADS view. The other selection here, Monitor Distance Coefficient, allows you to define a monitor distance that can be reached with an identical mouse movement at whatever zoom level. For example, the default value, 1.33, equates to 75% of a 16:ix monitor. With a value of 0, y'all volition observe that you need more mouse movement to aim at a target almost the boundaries of the screen than at a target closer to the reticle.
Mouse Acceleration is also customizable, letting yous adjust the acceleration cistron or completely disable information technology. At that place are also toggles for Mouse Filtering and Mouse Smoothing, both which tin can be disabled, to requite y'all true 1:1 input for pixel perfect precision.
Movement
In club to give yous even more control over your deportment, there are four different Behaviors options you can toggle: Automatic Airborne Mantling will climb ledges without an additional keypress, Slide can be toggled between a hold or quick tap, and Crouching and going Decumbent can be ready to hold, toggle or go-to.
In improver to an Auto Move Forward, two other Movement options are worth calling out:
Automatic Sprint: When enabled, moving forward while standing makes your Operator automatically dart, while double pressing the Sprint command activated Tactical Sprint. In that location is also Automatic Tactical Dart within this setting; when enabled, moving forward while standing will make your character automatically activate Tactical Sprint. Note that Automatic Dart will not change your current stance (e.chiliad.: crouched, prone) and will not abolish other options in progress (eastward.g.: reloading, aiming downwardly sights). For more than information on Automatic Tactical Sprint, visit our Movement affiliate.
Parachute Auto-Deploy: Operators who desire to alive on the border tin can choose to disable the auto-deployment of the parachute, assuasive them to attain the ground faster past deploying their parachute later than someone with Auto-Deploy turned on. However, turning this off means that it is ultimately upwardly to the Operator to pull their chute, which means those who don't will meet an untimely death.
Weapon
The main submenu nether here is for Behaviors. Yous tin change whether a weapon automatically switches when trying to fire with no ammo (Depleted Ammo Weapon Switch), and prepare Aim Down Sight (ADS), and Equipment activation behaviors every bit toggles or holds. There's also a variety of options for Weapon Mount Activations then you lot can change the keybind and activation to all-time conform your playstyle.
There are a few other settings here for keyboard and mouse users to actually fine tune how actions in the game behave:
Switch Weapon Minimum Filibuster: Fix the minimum time in milliseconds earlier it is possible to switch weapons over again. Depression values volition help apace switch weapons twice to cancel actions at the cost of it beingness more difficult to switch weapons with the mouse wheel. This setting is peculiarly helpful if you have a very fast scrolling mouse wheel. The trade-off is more about consistency. If the value is as well low, yous might switch weapon and abolish it. Having a slight delay makes weapon switch more than consistent with mouse wheel, but a loftier filibuster will make it harder to abolish information technology.
Weapon Switch Wrap-Around: When enabled, weapons will cycle on a loop when switching through them. When disabled, the next weapon push button will switch weapons until you are property the last equipped weapon with no wrap around, and previous weapon commands volition end with your first equipped weapon. This is an option if y'all prefer Previous Weapon to e'er grant you your primary weapon and Side by side Weapon to grant you lot your secondary weapon. Basically, pressing the previous weapon push multiple times volition stop at the offset weapon.
Weapon Mount Leave Delay:This sets the number of milliseconds a directional input must be held before beingness registered to leave Weapon Mounting. This delay requires that the Weapon Mounting Movement Go out choice is set to Enabled. This is peculiarly useful for players who like to quickly enter and go out Mounting. Past default, you demand to hold a directional input for a minimum delay earlier the mounted weapon is detached.
Vehicle & Killstreaks
Outside of Keybind options, this is where yous volition notice the Vehicle Camera Recenter toggle, as well every bit the option to modify the Armor Plate Behavior; either Employ One per button press, or Employ All (1 at a time, unless cancelled) after i button press.
Interface & Audio
Other than a few more Keybinds, this submenu deals with what type of control is needed to show the Scoreboard and Objectives (a Toggle or Hold), and the System Key Behavior.
Brandish
The Display carte du jour is where you're going to find the chief settings that will impact how the game is displayed and how objects on screen are rendered. In this section, yous can select the game's Display Mode (Windowed, Borderless Window, or Fullscreen), Brandish Monitor, Screen Refresh Rate, Return Resolution, Attribute Ratio, turn on V-Sync, and ready a custom Framerate Limit for both Gameplay and Menus if y'all're so inclined. If you lot leave these values off (set "Custom Framerate" to "Disable"),Warzone volition run at an uncapped framerate, limited only by your rig's hardware.
Rounding out this subsection is the pick to select a Display Gamma and switch between GPU (Brandish Adapters).
Details & Textures
These are the first set up of settings that will let you balance visuals with framerate. Yous can select the quality of Texture Resolution, Texture Filter Anisotropic (surfaces when viewed at an bending), Particle Quality, Bullet Impacts, and Tessellation. Changing these settings will have a different affect on different GPUs.Warzone will automatically adjust these to their ideal settings based on your GPU the first time you start the game, but you tin e'er adjust them later to fit your preference.
Shadow & Lighting
This submenu allows you to tinker with Shadow Map Resolution, Shadow Caster Levels, the ability to Enshroud Spot Shadows and Sun Shadows results, Ambience Apoplexy, and Particle Lighting. Warning: Some of these options use a significant amount of video retentiveness when enabled and volition take a substantial operation impact on certain GPUs.Warzone will automatically suit these to their ideal settings based on your GPU the starting time time y'all get-go the game, just you tin can always adjust them later to fit your preference.
Postal service Processing Effects
This is where you can adjust Anti-aliasing, Filmic Force, or the amount of temporal blurring vs. image stability when anti-aliasing, and the corporeality of Picture Grain on screen.
General Options:
Screen: Field of view is ane of the near requested graphical options. WithWarzone, this should be fix to make sure the game looks great on the widest variety of hardware, from the smallest monitor to a huge ultra-ultra-wide display. Notation that field of view may also affect frame rate, in that a wider field of view will display more images on screen and thus draw more power from your CPU/GPU.
Each weapon has its own zoom level. With the ADS field of view set to independent, the weapon ADS will override your field of view settings. With the value set to relative, the weapon will calibration the field of view based on your settings. This is very useful for players playing on very high field of view as it will limit the FOV transition when in ADS. As for horizontal and vertical HUD boundaries, this is where you can adjust the horizontal and vertical margins of your heads-up display to better fit your screen.
This is too where you can skip the Introduction Video that plays during boot-up.
Accessibility: Bated from subtitles and language selections, we have two separate adjustments for colorblind gamers: You tin can choose the colorblind type (none, protanopia, deuteranopia, or tritanopia), which changes the color of various interface elements to lucifer your type. You tin likewise apply a colorblind target filter over the unabridged game earth, the HUD interface, or everything on the screen. Below this, there is the ability to disable or enable world motility blur (the simulated blurring of moving objects), and weapon move blur (the blur issue when the photographic camera or objects are moving quickly).
HUD: Three options exist in this section, starting with the option to modify the Mini Map Shape between Round and Foursquare. Next is Mini Map Rotation; past default, the mini map will always be oriented in the direction the player is facing, merely it tin can be disabled in lodge to brand the mini map static, with simply the histrion icon rotating inside the mini map. Last, the Compass Cardinal Direction Text can be inverse to testify messages at certain degrees (e.g. W at 270 for "W), or merely numbers.
Content Filters: Here, you can enable or disable text chat, the profanity filter within text chat, and dismemberment and gore effects on character models.
Telemetery: While fine tuning your settings, y'all're going to want some feedback on how the changes are affecting your framerate. In this menu you tin add some of that important telemetry to your HUD including the FPS counter. You lot'll also exist able to turn on indicators for server latency, muted sounds, and voice conversation so you tin can hands tell what's muted when using the mute hotkeys (F9 for master audio and F10 for vocalism chat). The indicators for muted sounds and voice chat is another innovative feature: To avert hitting these buttons past mistake, a telemetry widget has been added to the pinnacle of the screen to remind you, in case you disabled any of these options. The sound and vocalism chat telemetry widget allows you to remove these notifications to reduce visual noise.
Audio Options
Volumes:Just similar the customizations for graphics and controls,Warzone allows you to conform the sound mix to best conform your gaming preferences. Check out Developer Infinity Ward'southward web log for more details.
Vocalisation Chat:Split up to all the other Volume options, this is where y'all tin can adjust vox conversation book, microphone volume, open up mic recording threshold, and vocalisation conversation effects.
Account Options
Online:This is where you can turn crossplay and crossplay communication on and off, display unique ID numbers on thespian names, view your COD/Activision, account, and enable Streamer Mode, which replaces other players' names with random names.
Network:This department has four options for advanced users: the connectedness meter (a near real-time measurement of ping and packet loss in-game), geographical region, external IP address, and internal IP address. Nosotros highly advise leaving the last three options hidden if you visit this menu while alive streaming, taking screenshots, or doing video capture.
That essentially wraps upward all the controls and settings within Warzone. While this guide may have helped answer a few questions, information technology's best to experience the game for yourself and follow the in-game instructions. Otherwise, check out Activision Support for whatever further questions.
Useful Links: Other Guide Chapters:
Welcome to the Warzone: Basic Grooming
Pre-Game Preparation
Infil: Tactics in the Warzone
Exfil: Afterward Activeness Report
Tac Map: Atlas of Verdansk
Tac Map: Atlas of Rebirth Island
Source: https://www.callofduty.com/warzone/strategyguide/basic-training/gaining-complete-control-pc
0 Response to "How To Turn Off Auto Mantle Warzone"
Post a Comment